Feeling Inspired – Mixed Media Backgrounds

I started my day with a great walk (almost 2 miles – I’m so proud of myself). I returned home feeling invigorated and very inspired.

So, of course I headed to my craft space and got out some mixed media supplies!

I started with some heavy weight mixed media paper, a few stencils and modeling paste. I used two stencils per sheet to vary the texture and design. You don’t have to be perfect and fill in every area with paste. The idea is texture so be random for a more organic feel. No perfect straight lines or even exact shapes needed here.

After the modeling paste was dry I added a quick layer of Gesso to ready my paper for color. This makes sure your coloring supplies go on smoothly and react evenly. A good example is Gelotos – they are a waxy stick of pigment that you can scribble on your page then blend in with water or a baby wipe. If you don’t Gesso first, the scribbles will soak into the paper and you will not be able to totally blend them out – you will see the scribble marks. You may want that affect and that’s great but I like it to blend out. Also, your mediums will react differently on the paper vs the modeling paste giving you uneven coloring. Again, you may like that look but I don’t. If you Gesso you get an evenly reacting surface and that’s what I like.

That is one of the awesome reasons I like mixed media – the variety of processes and techniques that you can tailor to your own likes to achieve your own style. There really aren’t many rules in mixed media (other than color theory – don’t make mud), anything goes so have fun. Try something new. Be bold. Be brave. If it comes out ugly just Gesso over it or throw it away – it’s only paper and you have learned what doesn’t work or what you don’t like. And I’ll bet you had fun along the way even if you don’t like the result.

I had so much fun with the color! This first one was done with Faber Castel Gelotos applied directly to the sheet. I then spritzed with water and blended in the colors with a brush. When dry, I spritzed with some pearl Tattered Angels glimmer mist.

A close up showing the pearl glimmer mist.

The next one I used three different blues from my Magicals collection. I sprinkled on the powder and spritzed with water tilting the paper around to get the colors to run and blend. I’m pleased with the results – but really, how can you go wrong with blue?

A close up showing the awesome affects you get with the Magicals.

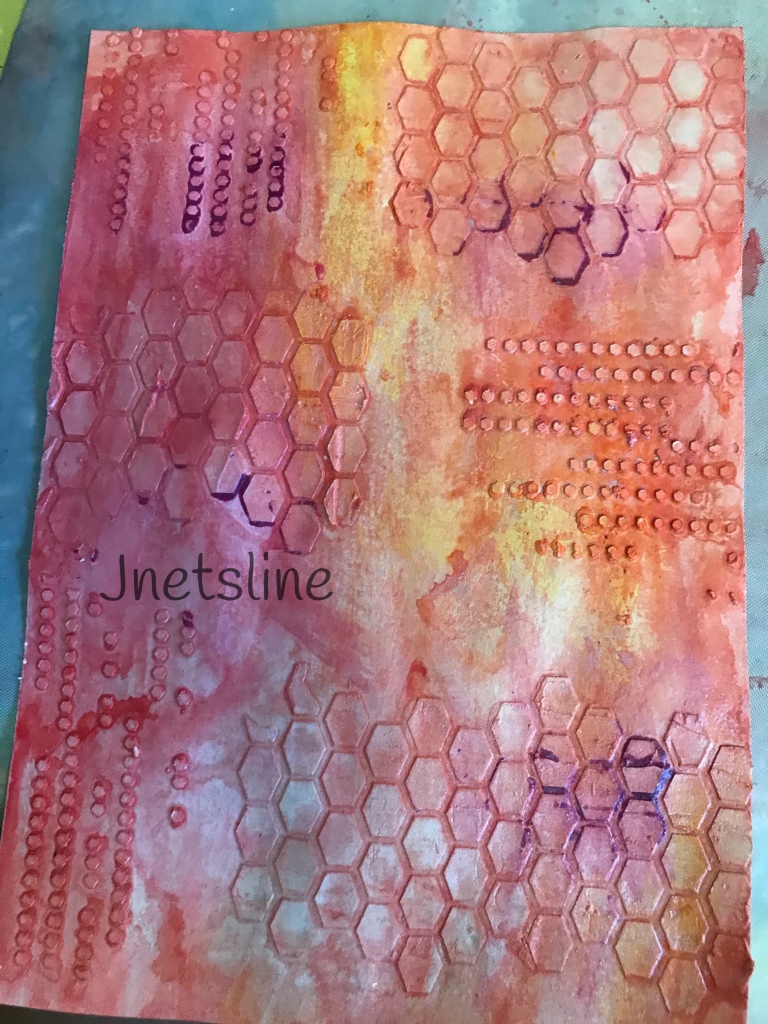
The third one, I again used the Magicals but this time I went with yellow with a bit of orange. One of the yellows had green in it so there is tint of green in the mica shine. I sprinkled on three colors, spritzed with water and tilted the paper to move and blend the colors. I dried it a bit with my heat gun and added another layer in the same manner.

Magicals are awesome!

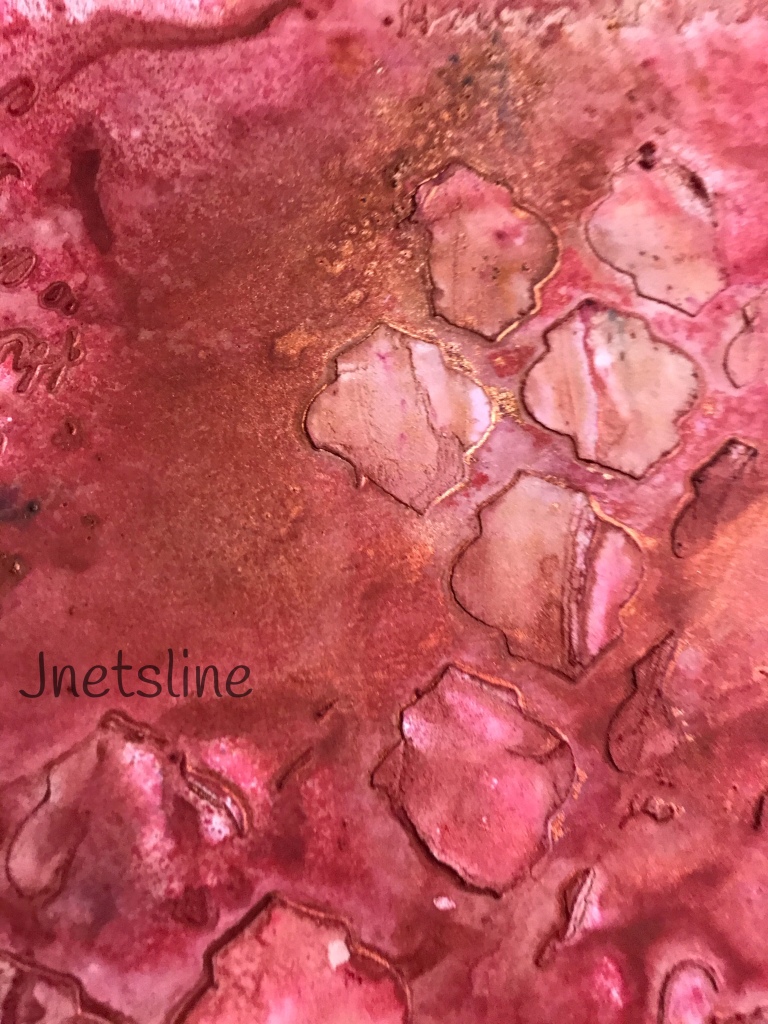
The last sheet I did using sprays. I had two lovely reds but after applying them there really wasn’t much variation in the color. I had some pink sprays but I didn’t want to lighten the page, I wanted to keep a vibrant rich red so I turned to my Magicals again and chose a great brown that came out coppery on the red. I love the result. I think this one is my favorite!

You can see the copper here but I couldn’t get a good shot of the shimmer in that copper. ☹️

I had so much fun working on these backgrounds today I loved playing with all the lovely bright colors that signify spring to me. Now to decide how to use them? There will be at least one set of ATC’s but I’m not not sure about the rest. Any suggestions? Leave me a comment below if you have some ideas.

Thank you for stopping by and spending a few moments with me today. Thank you for letting me share my creativity with you. Please let me know in the comments below if you have any questions about procedures or products used today. I would also love to know which one is your favorite and why? Leave me a comment to tell me.

If you haven’t already done do, I would love for you to follow me on WordPress or via e-mail so you don’t miss anything. Next up I will be using these great backgrounds. Don’t you want to see how they end up? If you like my post, please give it a like and share it with someone else who may enjoy it.

Thank you again my friends. Til next time – happy crafting!

Jeanette

Day 28 of #100dayproject

Unexpectedly I was able to come home for 24 hours before going to my next assignment. It was nice to spend the night in my own bed – with my kitties!! Boy do I miss them when I am away dog sitting. At least I have comfort of mind knowing my mom is giving them lots of  love and great care – thanks Mom.

My dad is having surgery today so I was really glad I got to get home and give him a good luck hug and kiss before surgery.  He has spinal stenosis and is having a nerve stimulator implanted so its not a real big deal, but it is surgery and that is always scary.  So, good luck Dad!

Being home for a few hours gave me time to play in MY craftroom!  Woohoo!  I have been missing my mixed media, playing with color and layers and getting all painty and inky!  Its soooo much fun and gives me such a feeling of being free and happy.  My head is really hurting today, but it still felt good to sit at my desk and create something from nothing, something beautiful that I hope gives someone else as much joy as it gave me creating it!

I made a lovely bright yellow and orange gift tag.  I realized that’s two days in a row I was drawn to yellow and orange – I wonder what that means?  Any ideas?  Leave me a comment if you know anything about the meaning of colors.

I started with a piece of scrap I found on my desk.  I had used it to test some modeling paste.  The modeling paste was colored with some Distress Oxide Ink.  I had punched a butterfly out of the bottom of it so I decided to cut it down to a tag shape and went from there.

I colored it with more Distress Oxide Ink in yellow and orange.  I added a K & Company butterfly, Tim Holtz Chit Chat words, and a yellow eyelet.  I tied some coordinating fibers and added charms to the end of the twine bow (a feather and a swan to complete the flight theme).  I framed the sentiment with black pen and a Big Brush PITT pen.  I used the PITT pen to frame the tag too.

I stamped “To” and “From” on the back from the Stampin Up “Here’s to Cheers stamp set.  Now it’s all set to top of a very special gift!

I didn’t have a lot of time to spend creating today but it was still enough to create something beautiful that really makes me happy.  It was time that I was able to push my head pain back and have a few moments of freedom and joy.  This led to the sentiment “fly everyday” as a reminder to use my wings every day to be free and enjoy.

Thank you for stopping by and spending a few moments with me.  I hope you enjoyed your visit and that maybe I inspired you to create something of your own.  Please leave me a comment and let me know if I did inspire you and share what you create — I would love to see it.  Share my post with someone else that you think might be inspired.  Let me know if you have any questions about products, exact color names or procedures used today.

Now I am off to an assignment for a friend that is crafty (she made beautiful decorations for her son’s wedding) but she doesn’t have a craft room (so sad).  I plan to post the gift I made for Mothers Day on Sunday, but I have to bring other things I am able to do without a craft room that I can post for you on the other days.  So don’t forget to come back and see what I create.

Til next time, happy crafting ……..

Jeanette

Day 15 of #100dayproject

I am sorry I missed my project yesterday my crafty friends – my head was bad again – woke me at 4:30 pounding!  I hate starting my day with it bad.  It finally eased up after dinner, thank goodness.  It is not great today, but I am managing.  I’m very disappointed I missed another day, putting me further behind in the project. I should be on 18 today – only 3 days behind so I guess that’s not too bad.  I am disappointed but not discouraged.  I will keep going and I will complete my 100 days, no matter how long it takes me.

I am dog sitting again for two lovely and verrrry large Huskies and one sweet little cat.  Unfortunately, it is not for a crafty friend so I don’t have a craft room to borrow.  As a result, I had to get creative with my projects for the weekend.  I had to find things I could bring with me without too many supplies (or too much mess).

Today I decided to work with my new silicone molds and some Prima paper clay to make embellishments for future mixed media pieces.  This was my first time and I am pleased with the results – I can’t wait to use them.

You need silicone molds to easily remove your paper clay pieces.  I have a few molds from different places.  The gray ones are from Prima and these are a stiffer silicone.  The red one are from Mod Podge.  They make (or made? I can’t find any on their website so maybe they don’t make them anymore – though you can find them on Amazon) opaque white or colored sticks for use in your glue gun (I’m sorry, I don’t know if they are glue or if they have some silicone in them – they dry hard).  Anyway, the red molds are made for the glue sticks but they work fine with the paper clay.  The pink one was a cheap one I ordered from China and it worked fine but it was much softer (jellier) which made it a bit harder to use with the paper clay – it took a lot more manipulating to get the cavity filled (but not overfilled).

img_1804

As I said, the paper clay I used was from Prima and I found it very stiff and a bit dry.  I have seen YouTube videos with a much softer clay which seems easier to manipulate.  They say the softer the clay, the harder it is to remove your piece and recommend cornstarch or baby powder.  I had no problem removing the drier clay – my problem was getting it to be smooth, the pieces did not want to blend together.  I added a tiny bit of water (dipping one fingertip in at a time) and found that helped. They are not dry yet but you can see cracks in some of the pieces.  I’m OK with that, for my purposes it will just make them look more aged and worn.  They will accept paint easily, then I can stain or wax them to show detail.  Here’s what I made today:

img_1805

Here are some close-ups.  You can see the “cracks” on the keyhole pieces where the clay just wouldn’t blend together.  I love all of the detail you get with these molds and I can’t wait to use these pieces.  My brain is already swirling thinking of projects.  The process was not hard and the results are very cost effective.  The paper clay is not expensive (and you can use your coupons at any of the craft stores).  If I remember right, the cost of the molds was about the same as buying one package of pre-made embellishments – and now you can make as many pieces as you want and save a lot of money.  Just take a day to make a whole slew of pieces, then you have them ready to go for many projects to come.

I hope you liked my project today.  Thank you for stopping by today and I hope you come back soon to see how I use these pieces (I’ll be sure to point out when I use one).  If you have time, I would appreciate a like, comment or share.  Please let me know if you have any recommendations on clay or mold brands.  Also, please don’t hesitate to ask me anything – I would be happy to chat with you.  Thanks again for being with me today.

Til next time, happy crafting ….

Jeanette

Day 12 of #100dayproject

Today’s project was a mixed media piece on some recycled cardboard (the back of a pad or some other packaging).  I started with some torn pieces of old music paper and I applied them with matte gel medium.  I then added some modeling past through an Anna Griffin stencil.  Yellow and red paint came next that I spritzed with water to help it blend and run.  Then I spritzed some red chalk spray through another stencil – it didn’t show up in the end though :o(.  I dripped some black mica ink spray across the top and spritzed it with water to help it run.  I stamped various images with black Archival ink.  I used a sponge to frame the piece with the black Archival ink.  Next came gold wax that I rubbed on to highlight the texture of the modeling paste.  I added white acrylic paint with various caps to make circles and the edge of a credit card to make the lines.  I splattered with watered down black & white acrylic paint.

The added pieces were fun.  I found a bag of red glass pieces and loved the way it matched so I dug out some thin gold wire to wrap around the glass pieces and they look fabulous!  I used two lovely pieces of chipboard from Maremi Small Art that I painted white.  I also had a white frame in my stash that fit perfectly and rubbed gold wax on it to highlight the texture.  I also found a old gold and yellow butterfly pin in my stash that coordinated nicely, all I had to do was clip off the pin backing and attach it with gel medium.  All my pieces were glued down with gel medium by the way.

I chose a moving quote from Helen Keller and printed it on white card stock.  I cut it out and matted it on black card stock and added the pieces with gel medium.  When dry, I used my Faber Castell Pitt pens to add red and orange color to coordinate with the page.

Here is a close-up showing some of the gold wax.  I love the sparkle from the wax and the mica ink I used.  It’s so hard to get it to show up in the photographs but I got a little to show here.

I hope you like my project today.  The sentiment has a lot of meaning for me as I have been struggling for years to move forward.  It really spoke to me and made me realize that “I” make the changes I want.  Very thought provoking for me.  What does it say to you?  Are you going through a journey?  How are you achieving your goals?  I would love to hear from you.  Do you use your art to help?  I am finding it very helpful. I know I have said it before, but I am also finding the #100day project to be so helpful in my journey, both personally and in my art.  I was always so indecisive in my work – always wondering what others would think of it, and now I am so much more confident in my choices and I just “do it”.  I just do what I like and don’t allow myself to wonder what others will think.  I am doing what makes me happy and in return it is giving me such confidence – and I am loving it!

Thank you so much for stopping by today and I hope to see you back again soon.  Please let me know if you have any questions about products or procedures I used today, I would be happy to provide any additional information you need.  If you have a moment, I would appreciate if you could like, comment or share my post.

Til next time, happy crafting!

Jeanette

ps: here is a picture of my Izzy helping me photograph my project today!  I am not sure she knows the meaning of helper?  Did you notice how many crafters are also cat lovers?  I love to see the cats walk across the screen on YouTube videos.